History of Rice Krispie Treats
The origin of Rice Krispie Treats can be traced back to the 1930s, when the recipe was first developed by two women from the state of Kansas, Mildred Day and her friend, Ellen. They created the snack as a way to fundraise for their local Girl Scout troop. This initial combination of Rice Krispies, marshmallows, and butter was published in the 1939 edition of a promotional cookbook produced by the Kellogg Company. The simplicity and deliciousness of this treat quickly resonated with many, leading to its widespread popularity.
As the years progressed, the recipe for Rice Krispie Treats evolved, with variations being introduced to the original concept. In the post-World War II era, the treat experienced significant marketing efforts from Kellogg’s, which capitalized on its growing appeal. The company began to promote the snack vigorously in their advertisements and included it in various cookbooks, solidifying its status as an American favorite. By the 1960s and 70s, Rice Krispie Treats had become synonymous with childhood memories and family gatherings, often being featured at birthday parties, school events, and holiday celebrations.
The cultural significance of Rice Krispie Treats extends beyond mere enjoyment; these treats have become linked to various seasonal festivities, where they are often shaped and decorated to reflect themes relevant to the occasion. For example, during Halloween, treats might be shaped into spooky figures, while Christmas versions could take on the form of festive trees or stars. Their versatility and ease of preparation have made Rice Krispie Treats a beloved staple in American households, where they continue to be enjoyed by both children and adults alike.
Classic Recipe: How to Make Perfect Rice Krispie Treats
To create deliciously chewy and delightful Rice Krispie Treats, you will need a few simple ingredients: 6 cups of Rice Krispies cereal, 4 cups of mini marshmallows, and 3 tablespoons of unsalted butter. This classic recipe serves as a foundational method for making these sweet treats, and with the right technique, you can achieve the perfect balance of flavor and texture.
Start by gathering your equipment: a large saucepan, a spatula, a mixing bowl, and a 9×13-inch baking dish. Lightly grease the baking dish to prevent sticking. In a large saucepan over low heat, melt the unsalted butter completely. It is crucial to keep the heat low to avoid burning. Once the butter has melted, add the mini marshmallows and stir continuously until they are fully melted and smooth. This step is essential, as improperly melted marshmallows can lead to a hardening of the treats.
Once the marshmallows are melted, remove the saucepan from heat and gently fold in the Rice Krispies cereal. Be careful not to overmix, as this can lead to tough treats. Spread the mixture evenly into the prepared baking dish, using the spatula to press it down firmly but gently. To ensure the best possible texture, aim for a thickness of about one to two inches.
Let the mixture cool for approximately 30 minutes at room temperature. Once it is set, you can cut the Rice Krispie Treats into squares or rectangles. For added flavor variety, consider topping your treats with melted chocolate or adding candy pieces. By following these steps, you will have successfully made classic Rice Krispie Treats that are sure to delight your family and friends.
Creative Variations on Rice Krispie Treats
While the classic Rice Krispie Treats recipe is beloved for its simplicity and deliciousness, there are numerous creative variations that can elevate these treats to new heights. By experimenting with different flavor combinations and mix-ins, one can create a delightful array of snacks that cater to various taste preferences and occasions.
One popular twist is the addition of chocolate. By incorporating chocolate chips, melted chocolate, or even cocoa powder into the recipe, one can transform the standard Rice Krispie Treats into a chocolate lover’s dream. Peanut butter is another excellent option; swapping out some of the butter for creamy or crunchy peanut butter introduces a rich, nutty flavor that pairs beautifully with the gooey marshmallows. For those who enjoy fruity flavors, adding a splash of fruit extract or mixing in dried fruits such as cranberries, raisins, or even colorful sprinkles can create a refreshing variation.
Special occasions call for themed Rice Krispie Treats that add a personal touch to delightful moments. For example, rainbow-colored treats can be made for Pride celebrations, utilizing a mix of colored marshmallows and food dye to achieve a vibrant appearance. Similarly, pumpkin spice Rice Krispie Treats are the perfect fall treat; incorporating pumpkin puree and a blend of warm spices can evoke the essence of the season. During the festive winter months, one can create Christmas-themed treats by decorating them with edible glitter or chocolate frosting. Additionally, incorporating peppermint extract brings a refreshing twist that complements the holiday spirit.
Encouragement to experiment with unique ingredients is key. Readers are urged to explore various combinations to develop their own signature Rice Krispie Treats that reflect their personal tastes and celebrated traditions. The possibilities are virtually limitless, making these treats a fun and versatile dessert for all occasions.
Storage Tips and Serving Suggestions
To ensure that your Rice Krispie Treats remain fresh and chewy, proper storage is essential. After preparing these delightful confections, allow them to cool completely at room temperature. Once cooled, cut them into squares or desired shapes. The ideal way to store Rice Krispie Treats is in an airtight container. This method helps to maintain their texture and prevents them from becoming stale. It’s advisable to place a piece of parchment paper between layers of treats in the container to minimize sticking, which can ruin their shape and texture.
If you wish to extend their freshness, freezing Rice Krispie Treats is a viable option. Wrap the treats tightly in plastic wrap to protect them from freezer burn, and then place them in a zip-top freezer bag. This way, they can last for up to three months in the freezer. When ready to enjoy, simply remove them from the freezer and allow them to thaw at room temperature. This method helps maintain the chewy texture, allowing you to delight in their taste long after the initial preparation.
Serving suggestions for Rice Krispie Treats can be as creative as the treats themselves. You may use cookie cutters to shape them into fun designs, perfect for holidays or themed parties. Additionally, consider incorporating them into a dessert table, which adds a playful touch to your gatherings. Pairing Rice Krispie Treats with ice cream creates a delightful dessert duo; the crunchy treat complements the creamy ice cream perfectly. You can also drizzle melted chocolate or caramel over the top for an extra layer of flavor. Such innovative serving ideas not only enhance the visual appeal but also elevate the experience of enjoying Rice Krispie Treats in diverse ways.
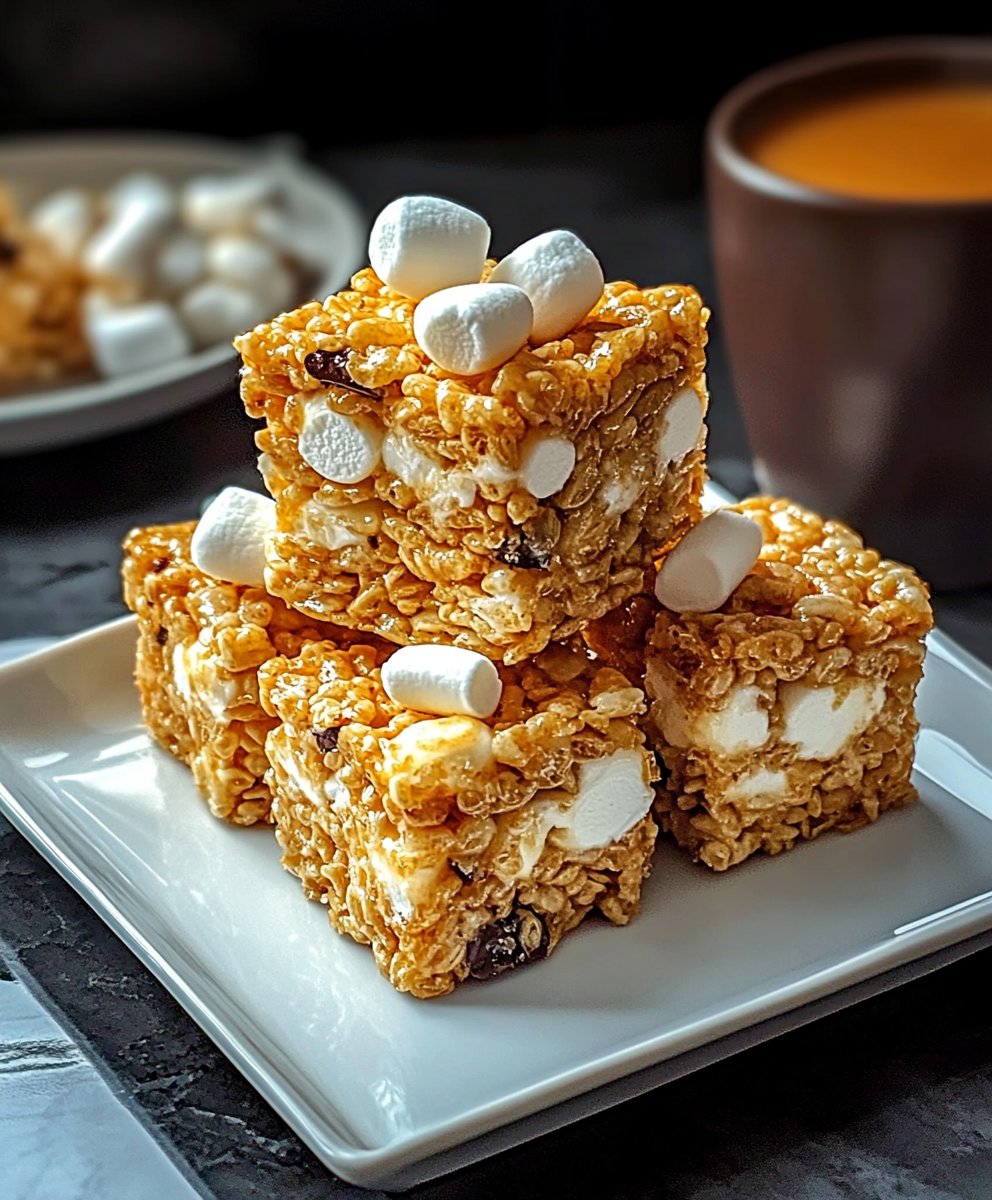
Rice Krispie Treats
Ingredients
- 6 cups Rice Krispies cereal
- 4 cups mini marshmallows
- 3 tablespoons unsalted butter
Instructions
- Prepare the pan: Grease a 9×13 inch baking dish.
- Melt the butter: In a large saucepan over low heat, melt the butter completely.
- Add marshmallows: Add the mini marshmallows to the melted butter and stir constantly until they are completely melted and smooth.
- Combine with cereal: Remove the saucepan from the heat and gently fold in the Rice Krispies cereal. Do not overmix.
- Press into pan: Pour the mixture into the prepared baking dish and press it down firmly but gently with a spatula. Aim for a thickness of about 1-2 inches.
- Cool and cut: Let the mixture cool at room temperature for about 30 minutes, or until set. Cut into squares or desired shapes.
Notes
- Use fresh marshmallows for the best texture.
- Keep the heat low when melting the butter and marshmallows to prevent burning.
- Don’t overmix the cereal, as this can make the treats tough.
- For extra flavor, you can add a pinch of salt to the melted marshmallow mixture.
- Get creative with mix-ins! Try adding chocolate chips, sprinkles, or other candies.
- For easier cutting, lightly grease your knife or spatula.
- Store leftover treats in an airtight container at room temperature for up to a week.